COMP 4108 Assignment 2
Rootkits
Due 11:59PM on 23-Feb-2026
94 marks total
For this assignment, you may optionally work with one other student.
Submit TWO files to Brightspace:
- A TAR or ZIP archive, named
code_package[.tar.gz/.tar.xz/.zip], containing any requested code or script files. The names for these files will be specified in the relevant question. - A PDF, named
report.pdf, with your answers to assignment questions. At the top of the first page, include all of the following: your full name(s), your student number(s) (if you are working in a group, both members of the group must be listed), the course number, the assignment number, and the date.
If you are working in a group, only one member of the group needs to submit.
Setup (0 Marks)
Note: Instructions are current as of Sept 2025.
This section explains the setup steps for this assignment (and future ones). You do not have to submit anything for this section.
If you have completed the setup steps for Assignment 1, you will already have created a Linux virtual machine for this course on the SCS OpenStack platform. You will re-purpose that VM instance for this assignment.
Rebuilding your virtual machine
After logging in to OpenStack, you will land on the Overview page. Please ensure you have the COMP4108B-W26 course project selected in the drop-down menu at the top-left of the page, to the right of the OpenStack logo.
- In the sidebar menu on the left, navigate to Project ➤ Compute ➤ Instances.
- Find your VM instance in the table. (You may need to use the search tool above the table to filter by Instance Name.) At the right end of your row, click the button to the right of Create Snapshot. Select Rebuild Instance in the drop-down menu.
- Within the Rebuild Instance modal:
- In the drop-down below Select Image, select the
comp4108-w26-assignment-02option. - Click the blue Rebuild Instance button at the bottom-right of the modal.
- In the drop-down below Select Image, select the
Accessing your virtual machine
The rebuild operation will have reset your VM instance to use the snapshot image for Assignment 2. This means that any setup steps (e.g., sending your public key over SSH) you took in Assignment 1 to access your student user account will have been lost. Please refer to the relevant section of the Assignment 1 specification to restore your preferred settings.
In particular, the student user account's password will need to be reset again. It is the same default password used in Assignment 1.
If you use your terminal's ssh client to access your VM instance, it may complain that the remote host identification was changed. (This is because the same IP address now resolves to a different VM instance, which is confusing to your client.) You can run the following command to clear your client's memory of your VM instance:
ssh-keygen -R [your-vm-external-ip-address]
Part A - Introduction (14 Marks)
Relevant textbook sections: 6.7, 7.4, 7.5
This assignment expands on the privilege escalation carried out in Assignment 1, Part B to now implement kernel-mode rootkit functionality on your VM.
Section 7.5 of the course textbook details how rootkit software can use system call hijacking to remain hidden. (There is a relevant passage on system calls, or syscalls, in section 6.8 of the textbook if you need a reminder.) A common way for a rootkit to do this is by hooking an OS's system calls through the installation of a loadable kernel module (LKM). In the Ubuntu OS, LKMs are managed using the insmod and rmmod utilities, but these require superuser privileges. Instead, your privilege escalation from the previous assignment now makes this possible by logging in as the root user.
You will write a working kernel module that emulates how a rootkit might perform a direct kernel object modification to quietly perform superuser tasks as a regular (non-root) user, as well as postprocess the results of a directory listing to hide its malicious files, through an LKM. (We will allow you to use sudo when loading this LKM, rather than having you reuse your root shell from Assignment 1.) Kernel module development has a sharp learning curve, and it does not allow the use of C standard libraries—only symbols made available by /proc/kallsyms. For this reason, you will be guided using starter LKM code that we provide you.
Begin by downloading the starter code from this archive as the basis for your LKM code. (It has TODO markers in the relevant areas to be implemented.) The username and password are posted in the Brightspace announcement for this assignment.
You will be writing code that runs in kernel space, affecting very important system calls. The slightest mistake will cause your VM to crash or become inoperable—and it is very likely that you will make these mistakes in this assignment. Any progress made on the VM may be lost. Therefore, you should make a habit of:
- Writing code on your local machine, and transferring your files to your VM to test. (Review the guidance on using
rsyncor SCP from Assignment 1.) - Testing small changes to your code, to easily isolate any unexpected bugs.
If you get locked out of your VM, you can perform a Hard Reboot of your instance in OpenStack. This action is found in the Instances table, in the drop-down at the right end of your row, by clicking the button to the right of Create Snapshot.
- 1 Mark What is the memory address of the
sys_call_tablesymbol in/proc/kallsyms? Use thesudocommand to gain access to this file. - 1 Mark Complete the function definition for
get_syscall_table_bfinrootkit.c. What value will this function return on your VM? Briefly explain.- Hint – At any point during this assignment, you can search the Linux kernel's source code for any symbol (e.g., constants, functions) that you don't understand. The Elixir cross-referencer by Bootlin (see link in next sentence) is a good online tool for this, since it has an identifier search feature, and will usually lead you to its documentation in the source code. The kernel version for your VM is
v5.4.171, and the appropriate start page in Elixir for that version is here: https://elixir.bootlin.com/linux/v5.4.171/source
- Hint – At any point during this assignment, you can search the Linux kernel's source code for any symbol (e.g., constants, functions) that you don't understand. The Elixir cross-referencer by Bootlin (see link in next sentence) is a good online tool for this, since it has an identifier search feature, and will usually lead you to its documentation in the source code. The kernel version for your VM is
- 2 Marks (total) Transfer all of your LKM code to your VM, and use
maketo build the LKM. (Ignore any warnings about unused variables for now.)- 1 Mark Run
insert.shas superuser to load the LKM. With two screenshots, demonstrate that your LKM loaded successfully by showing the relevant output oflsmod, and then showing the rootkit's log output in/var/log/syslogusingtail.- Hint – If you get an
Operation not permittederror, it's probably not a permission error: you likely did not correctly implementget_syscall_table_bf.
- Hint – If you get an
- 1 Mark Run
eject.shas superuser to unload the LKM. With one screenshot, demonstrate that your LKM unloaded successfully by showing the relevant log output in/var/log/syslogusingtail.
- 1 Mark Run
- 6 Marks Finish implementing the LKM code so that the starter code's
new_openathook is installed when loading your module, and removed when unloading it. Demonstrate this working successfully by explaining how to force the hook to run, and showing relevant log outputs from/var/log/syslogimmediately before and after your demonstration. Submit yourrootkit.cin your code package asa-4-rootkit.c.- Hint – To demonstrate a successful hook, you will need to understand what the
new_openathook is trying to accomplish.
- Hint – To demonstrate a successful hook, you will need to understand what the
- 4 Marks Select two security principles from Chapter 1.7 of the course textbook that could help to mitigate rootkits. From your experience with LKMs thus far, did the Linux kernel do a good job of following these principles? Explain.
Part B - Backdoor (30 Marks)
Relevant textbook sections: 7.4, 7.5
This part involves performing a direct kernel object modification (DKOM) using your LKM to install a backdoor on your VM. This backdoor will enable your student user to silently execute commands with superuser privileges without having to switch to the root user.
Code running in kernel space is privileged, completely bypassing user mode protections and directly accessing kernel-reserved data structures in memory. In the Linux kernel, one of these data structures is a task credential, which tracks what a process is capable of doing to another object. (The Linux Kernel Organisation has a technical guide on this topic.) A process spawned by your student user creates a task credential with regular user privileges, but an LKM can alter this, to provide superuser privileges.
You will modify your LKM to hook the execve system call. In your hook, you will detect when the spawned task belongs to your user, and alter its credential to effectively act as root.
From here on, this assignment will require you to write your own hooks for your LKM. Your experience with the C programming language will be important, but if you have never written kernel code, you will want some background to get started. The Linux Documentation Project has a guide on kernel module programming, though it targets the v2.6 kernel and will contain some outdated information. Here are some suggested topics to read through:
- Section 2.1 - Structure of a module, and basic logging.
- Section 2.6 - Passing command line arguments to a module.
- Section 3.1 - Differences between C programs and kernel modules. Specifically subsections 3.1.2, 3.1.3, and 3.1.5.
- Section 8.1 - System calls, and an example hook with comments.
One specific change since the v2.6 Linux kernel is that the memory where sys_call_table lives is now read-only. (In fact, since 2024, sys_call_table is no longer even viable for hooking.) Your LKM now needs to make it writable before overwriting values within that block of memory. Note that, in Part A, you were guided to do this through TODO instructions to enable the correct working of the openat hook from the starter code.
8 Marks Write a new hook for the
execvesystem call in your LKM from Part A. Define the hook such that, on calls toexecve, the OS logs (usingprintk) the name of the file being executed, and then logs the effective UID of the task. Explain how to force the hook to run, and illustrate it working successfully by showing relevant log outputs from/var/log/syslog. For example, the correct output when spawning a process for/usr/bin/tailasstudentis:Jan 28 20:49:17 COMP4108-A2 kernel: [81423.749198] Executing /usr/bin/tail
Jan 28 20:49:17 COMP4108-A2 kernel: [81423.749200] Effective UID 1001- Hint – System call table offset constants are defined in
asm/unistd_64.h. - Hint – Utilities for working with task credentials are defined in
linux/cred.h. There are helpful macros here for accessing information about the current task's credential. - Hint – The
manpage forsyscall(2)has a helpful table for understanding which registers map to system call arguments in kernel code. Runninguname -ion your VM will tell you your target architecture. You should be able to work out how thenew_openathook retrieves itsfilenamevalue by consulting the function definition for openat.
- Hint – System call table offset constants are defined in
-
22 Marks Extend your
execvehook, such that whenever the process is spawned by UIDroot_uid, it is assigned a task credential that has its effective UID set to0. The value ofroot_uidmust be implemented as a module parameter, set via theinsmodcommand. Modifyinsert.shto provide the real UID for thestudentuser as this parameter. Demonstrate this working successfully with one screenshot by showing the following:- The result of the
whoamicommand asstudent, before the LKM is loaded. - Loading the LKM using
insert.sh. - The result of the
whoamicommand asstudent. - Unloading the LKM using
eject.sh. - The result of the
whoamicommand asstudent.
Submit your
rootkit.candinsert.shin your code package asb-2-rootkit.candb-2-insert.sh, respectively.- Hint – Task credentials must be prepared, altered, and then committed to the task. The task credentials you used in Part B, Question 1 are already committed to their task, so you cannot edit them as-is. There is a helper function called
prepare_kernel_cred()that can get you started, with documentation for it (and othercredstruct helpers) in kernel/cred.c.
- The result of the
Part C - File Cloaking (50 Marks)
Relevant textbook sections: 7.4, 7.5
This part involves postprocessing the results of a system call using your LKM to hide specific directory entries on your VM. A rootkit might do this to conceal an executable payload, making it difficult for the system administrator to find and remove. You will emulate this by writing a hook for the getdents64 system call, which takes in a file descriptor and outputs directory entries into a buffer for the caller. Your hook will omit specific entries from this buffer based on their file names.
5 Marks Write a new hook for the
getdents64system call that logs (usingprintk) the file name for all directory entries returned by the originalgetdents64. Explain how to force the hook to run, and provide a screenshot demonstrating this in your terminal, showing relevant log outputs from/var/log/syslog. For example, the correct output when reading directory entries for your project directory might look like:Oct 1 11:44:36 COMP4108-A2 kernel: [ 2266.441674] getdents64() hook invoked.
Oct 1 11:44:36 COMP4108-A2 kernel: [ 2266.441704] entry: rootkit.o
Oct 1 11:44:36 COMP4108-A2 kernel: [ 2266.441706] entry: .rootkit.mod.o.cmd
Oct 1 11:44:36 COMP4108-A2 kernel: [ 2266.441708] entry: ..
Oct 1 11:44:36 COMP4108-A2 kernel: [ 2266.441710] entry: insert.sh
Oct 1 11:44:36 COMP4108-A2 kernel: [ 2266.441711] entry: rootkit.c
Oct 1 11:44:36 COMP4108-A2 kernel: [ 2266.441712] entry: rootkit.mod.c
Oct 1 11:44:36 COMP4108-A2 kernel: [ 2266.441714] entry: rootkit.ko
...- Hint – The definition for the
linux_dirent64structure is in linux/dirent.h.
- Hint – The definition for the
-
45 Marks Extend your
getdents64hook, such that the buffer you return to the calling process does not include any directory entries with file names that start withmagic_prefix. The value ofmagic_prefixmust be implemented as a module parameter, set via theinsmodcommand. Modifyinsert.shto provide the prefix string__rootkit__as this parameter. Demonstrate this working successfully with one screenshot by showing the following:- Creating a file with the specified prefix in an otherwise populated directory.
- Listing all files in the current directory.
- Loading the LKM using
insert.sh. - Listing all files in the current directory.
- Unloading the LKM using
eject.sh. - Listing all files in the current directory.
Submit your
rootkit.candinsert.shin your code package asc-2-rootkit.candc-2-insert.sh, respectively.- Hint – Note that the output of
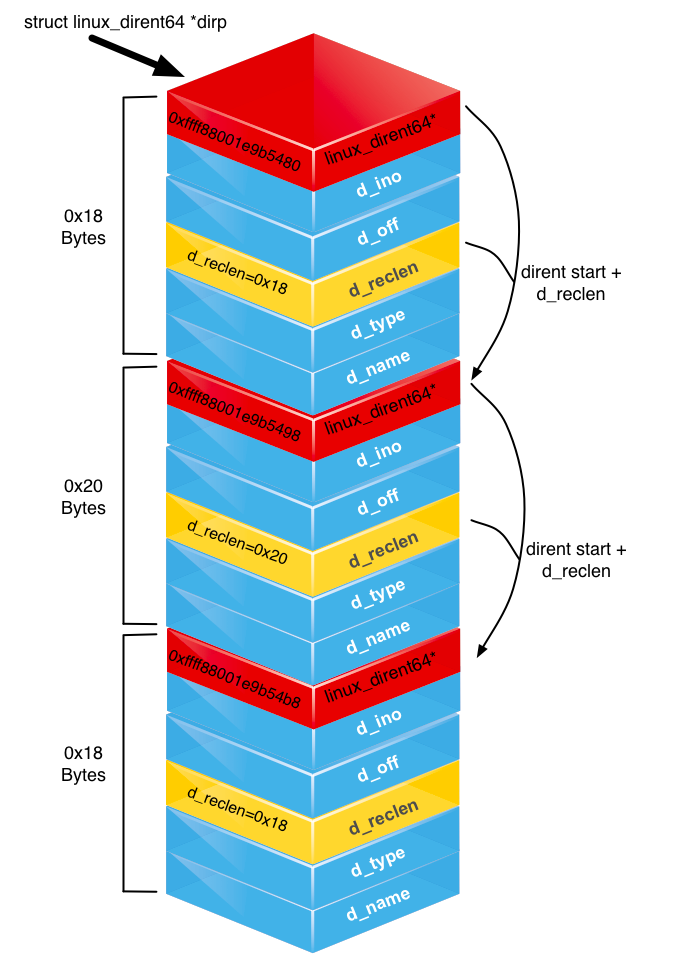
getdents64is not an array of equally sized structures. This supports a file name that can be from 1 to 255 bytes long. As such, alinux_dirent64struct describes its real size in itsd_reclenfield. This enables you to use it as a byte offset when jumping to the next entry in the buffer. The attached diagram helps to visualise this. - Hint – The input buffer,
dirp, is memory allocated by the caller in user space. You should not directly manipulate user-space memory, as this runs the risk of causing a kernel oops—functions such ascopy_from_userandcopy_to_userallow you to copy bytes safely to a kernel-space buffer that you create usingkmalloc. - Warning – Do not forget to
kfreeany kernel memory you allocate to your rootkit!